![[EC-CUBE] 商品ごとに税込か抜きかで分ける](/wp-content/uploads/2016/11/eccube_sep_tax_main-800x300.png "[EC-CUBE] 商品ごとに税込か抜きかで分ける")
とあるEC-CUBE案件で、商品ごとに税込みか税抜きかで表示を分けたいと依頼を受けまして、カスタマイズしてみました。
販売価格は、通常の商品と規格がある場合とでは登録する箇所が違ってきます。
なので管理画面では二つのページをカスタマイズするイメージですね。
あとは商品ページのtplファイルをアップデートして行くって感じです。
- 開発環境
-
- バージョン:EC-CUBE 2.13.2
- PHP:MySQL PHP 5.3
- データベース:MySQL 5.1
マスターデータの設定
データベースのテーブル追加設定
管理画面でもショップサイトでも使えるマスターデータの設定していきます。
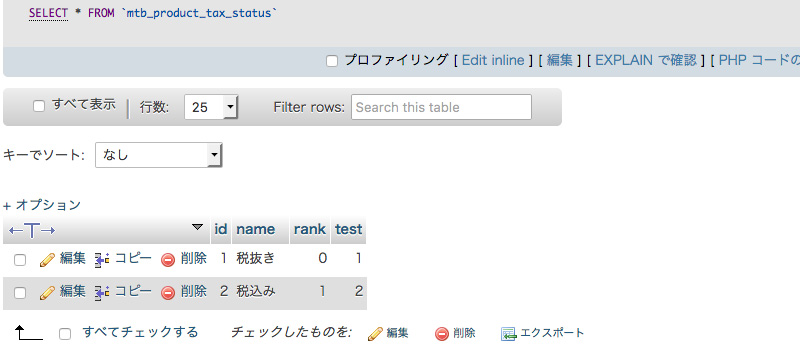
今回の案件ではphpmyadminを使っていたので、それにアクセスし、消費税抜きと込みのデータを設定します。

テーブルの内容・構造は商品タイプとかと同じなので、mtb_product_typeとかをコピーして(とりあえずtestmtb_product_typeという名前で)、下記のコードで名前変更しましょう。
ALTER TABLE testmtb_product_type RENAME TO mtb_product_tax_status;
mtb_product_tax_statusという名前にしました。
ここに
- 1:税抜き
- 2:税込み
というデータを追加します。
今回ではデフォルトが税抜きになるので、1番目が税抜きにしてます。
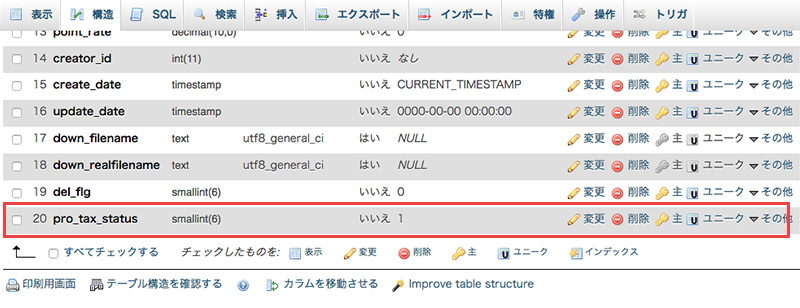
次に、商品規格の方の設定をしていきます。
「dtb_products_class」テーブルに下記のカラムを追加。
これは各商品に先ほどの1か2かを入れる要素を追加します。
- カラムネイム:pro_tax_status
- データ型 :smallint(6)
- デフォルト値:1
※1を設定することで全ての商品が「税抜き」になります。
これでデータベースの追加は終了。
EC-CUBEの管理画面に入り、マスターデータが追加されているか確認してみましょう。
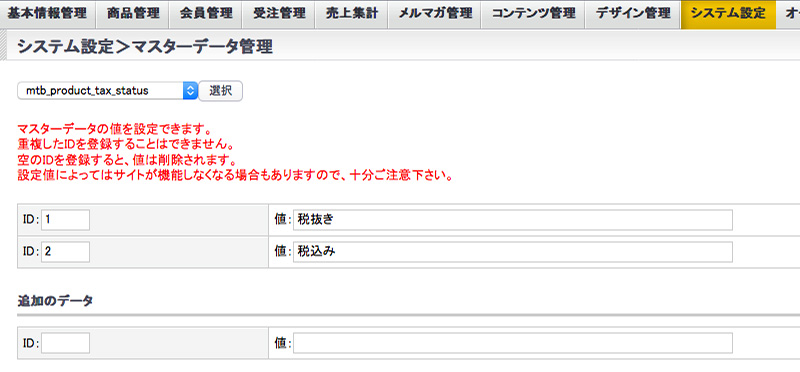
追加されてますね!
今度は、商品登録画面で、実際にどちらかを選択できようにしましょう。
まずは、クラス(データ)から見ていきます。
商品登録と規格の設定
さて、これから各クラスにコードを追加していきます。
※phpファイルの在りか(パス)は構築された方によって変わっている場合があるので参考程度に。
※コード行も人によって改変している可能性があるので、目安程度に。
※本当はexが付いてるエクステンドクラスに追加するのが普通らしいです。
管理画面のクラス
商品登録のクラス
LC_Page_Admin_Products_Product.php
/data/class/pages/admin/products/LC_Page_Admin_Products_Product.php- init()
先ほど追加した、pro_tax_statusをこの商品登録画面またはtpl内で使えるようにします。55行目あたり。
$this->arrMaker = SC_Helper_Maker_Ex::getIDValueList(); $this->arrAllowedTag = $masterData->getMasterData('mtb_allowed_tag'); $this->arrProductTaxStatus = $masterData->getMasterData('mtb_product_tax_status'); }- lfInitFormParam()
-
パラメーター情報の初期化に加えます。
if (OPTION_PRODUCT_TAX_RULE) {の前くらい。$objFormParam->addParam('消費税抜き・込み', 'pro_tax_status', INT_LEN, 'n', array('EXIST_CHECK', 'NUM_CHECK', 'MAX_LENGTH_CHECK')); - lfGetProductData_FromDB()
-
“DBから商品データを取得する”に加えます。 これで、既存の商品の編集時にも値を取得できます。
price02,
pro_tax_status,
deliv_fee,
- lfInsertDummyProductClass()
-
配列の添字を定義の追加。規格商品ではない場合の登録です。
// 配列の添字を定義
$checkArray = array('product_class_id', 'product_id', 'product_code', 'stock', 'stock_unlimited', 'price01', 'price02', 'pro_tax_status', 'sale_limit', 'deliv_fee', 'point_rate', 'product_type_id', 'down_filename', 'down_realfilename');
$sqlval['pro_tax_status'] = $sqlval['pro_tax_status']; $sqlval['stock_unlimited'] = $sqlval['stock_unlimited'] ? UNLIMITED_FLG_UNLIMITED : UNLIMITED_FLG_LIMITED; $sqlval['creator_id'] = strlen($_SESSION['member_id']) >= 1 ? $_SESSION['member_id'] : '0';
商品規格のクラス
LC_Page_Admin_Products_ProductClass.php
/data/class/pages/admin/products/LC_Page_Admin_Products_ProductClass.php- init()
ここでもpro_tax_statusを使えるようにします。
$this->arrProductTaxStatus = $masterData->getMasterData('mtb_product_tax_status');- initParam()
-
ここでもパラメーター情報の初期化に加えます。
$objFormParam->addParam('消費税抜き・込み', 'pro_tax_status', INT_LEN, 'n', array('EXIST_CHECK', 'NUM_CHECK', 'MAX_LENGTH_CHECK')); - registerProductClass()
-
規格の登録または更新用にキーワード「’pro_tax_status’,」を追加します。
// dtb_products_class 登録/更新用 $registerKeys = array( 'classcategory_id1', 'classcategory_id2', 'product_code', 'stock', 'price01', 'product_type_id','pro_tax_status', 'down_filename', 'down_realfilename', ); - lfCheckProductsClass()
-
必ずデフォルト値が入るようになっているんだけど、一応消費税抜き・込みの必須チェック
/* * 消費税抜き・込みの必須チェック */ if (SC_Utils_Ex::isBlank($arrValues['pro_tax_status'][$i])) { $arrErr['pro_tax_status'][$i] = '※ 消費税抜き・込みは、いずれかを選択してください。<br />'; } - doPreEdit()
-
規格編集画面にて$arrKeysにキーワードを追加。
/*
 * 登録済みのデータで, フォームの値を上書きする.
 *
 * 登録済みデータと, フォームの値は, 配列の形式が違うため,
 * 同じ形式の配列を生成し, マージしてフォームの値を上書きする
 */
$arrKeys = array('classcategory_id1', 'classcategory_id2', 'product_code',
    'classcategory_name1', 'classcategory_name2', 'stock',
    'stock_unlimited', 'price01', 'price02', 'pro_tax_status',
    'product_type_id', 'down_filename', 'down_realfilename', 'upload_index', 'tax_rate'
);
管理画面のSmartyファイル
次に管理画面のtplファイルの更新です。
商品登録のTPLファイル
product.tpl
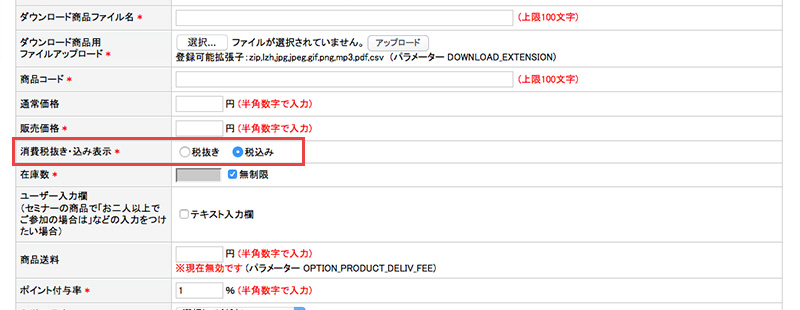
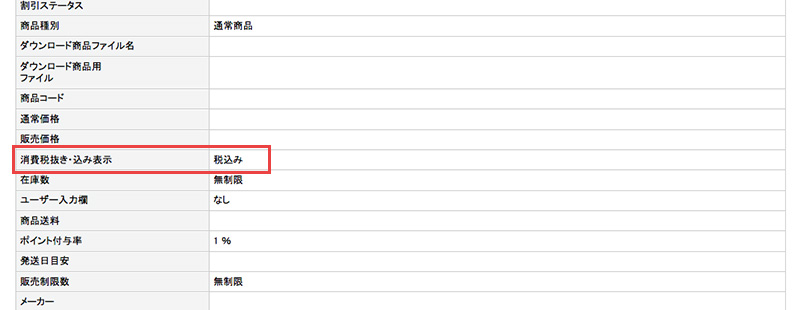
/data/Smarty/templates/admin/products/product.tplせっかくなので販売価格の次、消費税率の前に入れます。
<tr>
<th>消費税抜き・込み表示<span class="attention"> *</span></th>
<td>
<!--{html_radios name="pro_tax_status" options=$arrProductTaxStatus selected=$arrForm.pro_tax_status separator=' '}-->
</td>
</tr>
うまくいけばこんな感じになります。
商品登録確認画面のTPLファイル
confirm.tpl
/data/Smarty/templates/admin/products/confirm.tpl
<tr>
    <th>消費税抜き・込み表示</th>
    <td>
        <!--{$arrProductTaxStatus[$arrForm.pro_tax_status]}-->
    </td>
</tr>
うまくいけばこちらもこんな感じになります。他のデータは見えなく加工してます。一応。
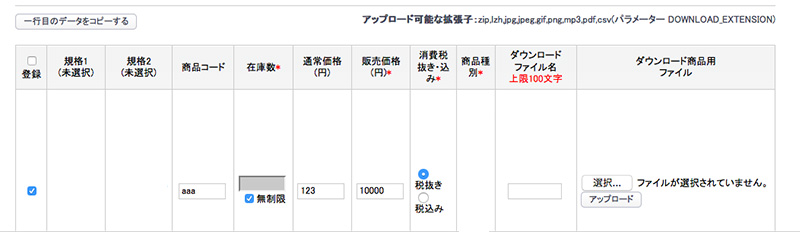
商品登録規格のTPLファイル
product_class.tpl
/data/Smarty/templates/admin/products/product_class.tpl<col width="8%">
ちゃんと合計で100%になるように入れます(入れなくても表示はされますが)。
<th>消費税抜き・込み<span class="attention">*</span></th>
を追加します。
消費税率のあとかな。
テーブルのどの列に入れたかちゃんと覚えて、プロダクトタイプの前に入れます。
<td class="class-product-tax">
    <!--{assign var=key value="pro_tax_status"}-->
    <!--{if $arrErr[$key][$index]}-->
        <span class="attention"><!--{$arrErr[$key][$index]}--></span>
    <!--{/if}-->
    <!--{foreach from=$arrProductTaxStatus key=ProductTaxKey item=ProductTax name=ProductTax}-->
        <input type="radio" name="<!--{$key}-->[<!--{$index}-->]" value="<!--{$ProductTaxKey}-->" <!--{if $arrForm[$key].value[$index] == $ProductTaxKey}-->checked="checked"<!--{/if}--> <!--{if $arrErr[$key][$index] != ""}--><!--{sfSetErrorStyle}--><!--{/if}--> id="<!--{$key}-->_<!--{$index}-->_<!--{$smarty.foreach.ProductTax.index}-->"><label for="<!--{$key}-->_<!--{$index}-->_<!--{$smarty.foreach.ProductTax.index}-->"<!--{if $arrErr[$key][$index] != ""}--><!--{sfSetErrorStyle}--><!--{/if}--> ><!--{$ProductTax}--></label><!--{if !$smarty.foreach.ProductTax.last}--><br /><!--{/if}-->
    <!--{/foreach}-->
</td>
1行目をコピーボタン
この辺りのもプロダクトタイプを見習って入れておきましょう。
var pro_tax_status_value = '';
$('input[id^=pro_tax_status_0_]').each(function() {
    if ($(this).attr('checked')) {
        pro_tax_status_value = $(this).val();
    }
});
$('input[id^=pro_tax_status_]').each(function() {
    if ($(this).val() == pro_tax_status_value) {
        $(this).attr('checked', true);
    }
});
商品登録規格確認画面のTPLファイル
product_class_confirm.tpl
/data/Smarty/templates/admin/products/product_class_confirm.tpl<th>消費税抜き・込み</th>
<td class="right">
    <!--{foreach from=$arrForm[$key].value[$index] item=pro_tax_status}-->
        <!--{$arrProductTaxStatus[$pro_tax_status]|h}-->
    <!--{/foreach}-->
</td>
一つづつ入っているのが確認できますね。
さて、これで管理画面での設定が終了しました!
設定してみて、ちゃんとDBに保存されているか確認してみてください。
ここまでおつかれさまです。
あと半分くらいです!
今度はショップサイトの方をカスタムしていきましょう。
ショップサイトの設定
ショップサイトのクラス
商品詳細のページクラス
LC_Page_Products_Detail.php
/data/class/pages/products/LC_Page_Products_Detail.php- init()
ここでもこちらを追加。
$this->arrProductTaxStatus = $masterData->getMasterData('mtb_product_tax_status');
商品データを扱うサービスクラス
SC_Product.php
/data/class/SC_Product.php商品データはこちらから取得しているので、ここでも変更が必要。
- setProductsClassByProductIds()
セレクトボックスに使用できるように変数に入れます。商品種別の近く。
foreachの前くらい。$classCategories['__unselected']['__unselected']['pro_tax_status'] = $arrProductClasses[0]['pro_tax_status'];
商品データとして渡してあげる
$arrClassCats2['pro_tax_status'] = $arrProductsClass['pro_tax_status'];
税別・税込み分ける。規格商品の場合は、JSも変更する必要があるのですが、それだと少々ややこしいので、元データをpro_tax_statusによって分けてしまいます。301〜304行目あたりにあるコードを下記のに置き換えちゃいます。
if($arrProductsClass['pro_tax_status'] == '1'){ $arrClassCats2['price02'] = $arrProductsClass['price02']; }else{ $arrClassCats2['price02'] = strlen($arrProductsClass['price02']) ? number_format(SC_Helper_TaxRule_Ex::sfCalcIncTax($arrProductsClass['price02'], $productId, $arrProductsClass['product_class_id'])) : ''; }- getProductsClassByQuery()
商品規格を取得するところに、pro_tax_statusも入れてあげます。
T1.price02,
T1.pro_tax_status,
T1.point_rate,
カートセッション管理クラス
SC_CartSession.php
/data/class/SC_CartSession.phpカート内で税込・税抜き表示が必要だったため、こちらも変更が必要。
- adjustSessionProductsClass()
下記コードを追加。
'product_code'        => true,
'pro_tax_status'      => true,
'stock'               => true,
これで、素材は揃った感じです。
あとはtplで表示していくだけ!
ショップサイトのSmartyファイル
商品詳細ページ
detail.tpl
/data/Smarty/templates/default/products/detail.tpl下記コードを追加。販売価格のとこです。この辺りとかそれ以降のTPLはデザインカスタマイズしてるので、デフォルトのと少し違いますが、基本がわかればできます。
通常価格のところもやってもいいかもです。
<!--★税抜きの場合★-->
<!--{if $tpl_pro_tax_status == 1}-->
    <!--{if $arrProduct.price02_min == $arrProduct.price02_max}-->
        <!--{$arrProduct.price02_min|number_format}-->
    <!--{else}-->
        <!--{$arrProduct.price02_min|number_format}-->~<!--{$arrProduct.price02_max|number_format}-->
    <!--{/if}-->
<!--★税込みの場合★-->
<!--{else}-->
    <!--{if $arrProduct.price02_min_inctax == $arrProduct.price02_max_inctax}-->
        <!--{$arrProduct.price02_min_inctax|number_format}-->
    <!--{else}-->
        <!--{$arrProduct.price02_min_inctax|number_format}-->~<!--{$arrProduct.price02_max_inctax|number_format}-->
    <!--{/if}-->
<!--{/if}-->
<!--{/strip}--></span><span id="price02_dynamic"></span>円 <!--{if $tpl_pro_tax_status == 1}-->(税抜き)<!--{else}-->(税込み)<!--{/if}-->
カートページ
index.tpl
/data/Smarty/templates/default/cart/index.tpl124行目と134行目辺りを書き換えます。
<!--{if $item.productsClass.pro_tax_status == 1}-->
    <!--{$item.price|number_format|h}-->円<br>
    <span class="em06">(税抜き)</span>
<!--{else}-->
    <!--{$item.price_inctax|number_format|h}-->円<br>
    <span class="em06">(税込み)</span>
<!--{/if}-->
<!--{if $item.productsClass.pro_tax_status == 1}-->
    <!--{$item.total_notax|number_format|h}-->円<br>
    <span class="em06">(税抜き)</span>
<!--{else}-->
    <!--{$item.total_inctax|number_format|h}-->円<br>
    <span class="em06">(税込み)</span>
<!--{/if}-->
カートページも消費税抜き表示にする場合、別で消費税だけ掲載しないといけません。
その場合、このコードで取得できます。
<!--{$tpl_total_tax[$key]|number_format|h}-->円
消費税抜きの商品合計金額
消費税抜きの商品合計金額が提供されていなかったので、自分で作る必要があります。
カートのページクラス:LC_Page_Cart.php
/data/class/pages/cart/LC_Page_Cart.php$this->tpl_total_notax[$key] = $objCartSess->getAllProductsNoTotal($key);
カートセッション管理クラス:SC_CartSession.php
/data/class/SC_CartSession.php
// 全商品の税抜合計価格を取得
public function getAllProductsNoTotal($productTypeId, $pref_id = 0, $country_id = 0)
{
    $total = 0;
    $max = $this->getMax($productTypeId);
    for ($i = 0; $i <= $max; $i++) {
        if (!isset($this->cartSession[$productTypeId][$i]['price'])) {
            $this->cartSession[$productTypeId][$i]['price'] = '';
        }
        $price = $this->cartSession[$productTypeId][$i]['price'];

        if (!isset($this->cartSession[$productTypeId][$i]['quantity'])) {
            $this->cartSession[$productTypeId][$i]['quantity'] = '';
        }
        $quantity = $this->cartSession[$productTypeId][$i]['quantity'];
        $total+= ($price * $quantity);
    }

    return $total;
}
購入確認ページ
confirm.tpl
/data/Smarty/templates/default/shopping/confirm.tpl
<!--{if $item.productsClass.pro_tax_status == 1}-->
    <!--{$item.price|number_format|h}-->円<br>
    <span class="em06">(税抜き)</span>
<!--{else}-->
    <!--{$item.price_inctax|number_format|h}-->円<br>
    <span class="em06">(税込み)</span>
<!--{/if}-->
<!--{if $item.productsClass.pro_tax_status == 1}-->
    <!--{$item.total_notax|number_format|h}-->円<br>
    <span class="em06">(税抜き)</span>
<!--{else}-->
    <!--{$item.total_inctax|number_format|h}-->円<br>
    <span class="em06">(税込み)</span>
<!--{/if}-->
商品購入確認ページもこちらで消費税が表示できます。
<!--{$tpl_total_tax[$cartKey]|number_format}-->円
これでフロント部分も完了!
おつかれさまでした!
あとスマホも同じ部分なので割愛しました。
デフォルトの状態のものと色々見比べてたらこんがらがってしまい、うまく書けたか心配です..。
気が向いたらサンプルサイト作ってみようかなと。
- ※注意点
-
- 商品登録時、いずれにせよ税抜き価格を入力してください。
- 商品規格登録時、規格内で一つ税込を選択すると価格表示時に差異が生じるので、全て税込を選択してください。
まとめ
注意点にもあるように、完璧でないところがあれですが。
言いわけじゃないですが、短期間でやらないといけなかったため、とりあえずな感じでリリースしました。今後もアップデートして行かないといけないっぽいので笑、この記事もアップデートしていけたらいいかなーと思ってます。


![[EC-CUBE] 商品ごとに税込か抜きかで分ける](/wp-content/uploads/2016/11/eccube_sep_tax_thums.jpg "[EC-CUBE] 商品ごとに税込か抜きかで分ける")
